Table of Contents
ToggleA bedroom makeover doesn’t require a contractor or a five-figure budget. Most homeowners can dramatically transform their sleeping space over a long weekend with paint, rearranged furniture, and strategic upgrades that cost less than new appliances. This guide walks through seven practical steps that focus on high-impact changes rather than cosmetic fluff. Whether working with a dated master suite or a cramped secondary bedroom, these techniques apply to any layout and skill level. The key is approaching the project methodically, starting with planning and prep rather than impulse purchases at the home center.
Key Takeaways
- A bedroom makeover can cost $500–$2,500 and be completed over 3–5 days of active work by allocating budget across paint (20–30%), textiles (25–35%), lighting (15–20%), and decor (15–25%).
- Decluttering, deep cleaning, and addressing structural issues like water stains or mold before cosmetic work prevents costly failures and ensures a lasting transformation.
- Wall color selection—choosing between warm neutrals, earthy tones, or moody darks based on natural light—creates the fastest, most impactful change in your bedroom makeover.
- Proper furniture arrangement with 24–36 inches of walking space, bed as the focal point, and nightstands at mattress height improves both function and comfort.
- Layered lighting with dimmers, quality bedding with 400–600 thread count sheets, and blackout curtains at ceiling height enhance sleep quality and ambiance without excessive spending.
Planning Your Bedroom Makeover on a Budget
Set a realistic budget before shopping or swinging a paintbrush. Bedroom makeovers typically run $500–$2,500 depending on room size and scope, but costs vary widely by region and material choices. Break the budget into categories: paint and wall treatments (20–30%), textiles and bedding (25–35%), lighting and hardware (15–20%), and decor or accessories (15–25%). This prevents overspending on throw pillows while skimping on quality paint.
Measure the room accurately. Record wall dimensions, ceiling height, window and door locations, and existing furniture footprints. Use graph paper or a free app like MagicPlan to sketch a scaled floor plan. Note electrical outlet and switch positions, relocating these requires a licensed electrician and permits in most jurisdictions, so plan furniture and lighting around existing wiring.
Identify must-haves versus nice-to-haves. A sagging mattress or broken blinds are functional fixes that deserve priority over decorative upgrades. Structural issues, cracks wider than 1/8 inch, water stains, or electrical problems, require professional assessment before cosmetic work begins. Painted-over mold or patched drywall that hasn’t addressed underlying moisture will fail within months.
Create a project timeline. Most bedroom makeovers take 3–5 days of active work spread over two weekends. Allow 24–48 hours of drying time between paint coats, and schedule furniture delivery or assembly for after wall work is complete. Ordering custom window treatments or special-order textiles can add 2–6 weeks, so plan accordingly.
Declutter and Deep Clean for a Fresh Start
Empty the room completely if possible. This exposes baseboard damage, outlet issues, and carpet stains hidden by furniture. It also makes painting, cleaning, and floor work significantly easier. Move furniture to a garage or adjacent room, grouping items by category (keep, donate, trash).
Vacuum baseboards, window tracks, and ceiling corners where dust and cobwebs accumulate. Use a shop vacuum with a brush attachment for textured walls or popcorn ceilings. Wipe down all surfaces with a damp microfiber cloth and mild detergent, TSP substitute works well for walls that will be painted, cutting through grease and grime that prevents paint adhesion.
Inspect and repair as you clean. Tighten loose outlet covers, patch nail holes with lightweight spackle, and caulk gaps between baseboards and walls. Sand spackle patches smooth with 120-grit sandpaper once dry (usually 30–60 minutes). Replace any cracked outlet covers or switch plates before painting, new ones cost under $2 each and make a noticeable difference.
Address carpet or flooring issues now. Steam-clean carpets or rent a professional-grade machine if DIY cleaning doesn’t remove stains. For hardwood, spot-treat scratches with matching wood filler and screen and recoat if the finish is worn. Luxury vinyl plank (LVP) installation is a manageable DIY project for intermediate skill levels, running $2–$5 per square foot for mid-grade materials, but requires a flat subfloor and proper acclimation (48 hours in the room before installation).
Choose a Color Palette That Sets the Mood
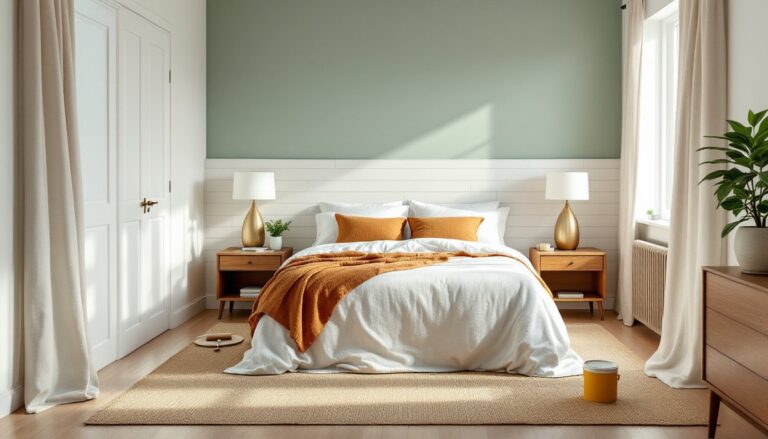
Wall color transforms a room faster than any other single change. Modern bedroom trends in 2026 lean toward warm neutrals (greige, warm whites), earthy tones (terracotta, sage), and moody darks (charcoal, navy) rather than the gray-everything trend of the past decade. Choose colors based on natural light, north-facing rooms benefit from warm tones to counter cool daylight, while south-facing rooms can handle cooler or darker shades.
Test paint samples before committing. Buy sample pots (8 oz) and paint 2×2-foot sections on at least two walls, color reads differently in morning versus evening light. Live with samples for 48 hours, observing how they look under both natural and artificial lighting. This $15–$25 investment prevents expensive mistakes.
Calculate paint needs accurately. One gallon of quality paint covers approximately 350–400 square feet per coat. Most bedrooms require 2–3 gallons for two coats, assuming standard 8-foot ceilings. Use a primer-sealer if painting over dark colors, stains, or fresh drywall, skipping primer leads to uneven coverage and wasted topcoat. Sherwin-Williams, Benjamin Moore, and Behr all offer paint-and-primer combinations that perform well for one-coat coverage over existing light colors.
Consider an accent wall if full-room color feels risky. The wall behind the bed is a natural focal point. Bold wallpaper, board-and-batten, or a contrasting paint color adds depth without overwhelming the space. Many interior design trends favor textured accent walls using shiplap or vertical paneling, which adds dimension and can be installed over existing drywall with construction adhesive and a finish nailer.
Update Your Bedding and Textiles
Bedding sets the visual tone and comfort level of the entire room. Budget $150–$400 for a complete bedding refresh including sheets, duvet or comforter, and pillows. Higher thread counts (400–600) provide better durability and feel than budget 200-count sets, but true quality also depends on fiber type and weave. Percale offers crisp, cool sheets ideal for warm sleepers, while sateen provides a softer, warmer feel.
Layer textiles for a curated look. Start with fitted and flat sheets, add a lightweight blanket or coverlet, then top with a duvet or quilt. Throw pillows and a bed runner add visual interest, but don’t go overboard, 2–4 accent pillows maximum. The goal is inviting, not a showroom that requires ten minutes of pillow removal before bed.
Window treatments control light and privacy while contributing to the color scheme. Blackout curtains improve sleep quality by blocking streetlights and early sun. Hang curtain rods at ceiling height rather than just above the window frame, this makes ceilings appear higher and allows more light when curtains are open. Standard curtain panels are 84, 96, or 108 inches long: measure from rod to floor before ordering.
Update or add an area rug to anchor the space. In bedrooms with hard flooring, a rug under and extending beyond the bed adds warmth and reduces noise. The rug should extend at least 18–24 inches on either side of the bed and beyond the foot. For queen beds, this typically means an 8×10-foot rug: kings often need 9×12. Natural fiber rugs (jute, sisal) add texture at lower cost than wool, but they’re rougher underfoot.
Rearrange Furniture for Better Flow and Function
Bedroom layout affects daily function more than aesthetics. The bed should be the focal point, typically centered on the longest wall or positioned to face the door without being directly in line with it. Leave at least 24–36 inches of walking space on either side for easy bed access and making. Cramped pathways make a room feel smaller regardless of actual square footage.
Position nightstands at the same height as the mattress top or slightly below. This makes reaching for a phone, lamp, or water glass comfortable from a lying position. If space is tight, wall-mounted floating shelves or swing-arm wall sconces eliminate the need for surface lamps, freeing up nightstand real estate.
Place dressers and larger furniture away from door swings and traffic paths. A dresser can function as a media console opposite the bed if needed, though sleep experts recommend removing TVs from bedrooms. If keeping a TV, ensure the screen sits at eye level when sitting up in bed, typically 40–48 inches from the floor for standard bed heights.
Angle furniture in oddly shaped or long narrow rooms. Placing the bed on a diagonal in a square room creates interest and can improve flow in tight spaces. This approach works best in rooms at least 12×12 feet, smaller spaces feel more cramped with angled furniture. Test arrangements by mapping with painter’s tape on the floor before moving heavy pieces. Projects involving DIY furniture arrangements often reveal creative solutions for difficult layouts.
Add Personal Touches with Lighting and Decor
Lighting makes or breaks bedroom ambiance. Replace builder-grade overhead fixtures with something more substantial, drum pendants, semi-flush mounts, or even a statement chandelier appropriate to ceiling height. Fixtures should hang with at least 7 feet of clearance from the floor. For low ceilings, choose flush or semi-flush mounts that sit tight to the ceiling.
Layer lighting types for flexibility. Ambient lighting (overhead fixtures) provides general illumination, task lighting (bedside lamps, reading sconces) supports specific activities, and accent lighting (picture lights, LED strips) adds depth. Install dimmer switches on overhead lights, a simple swap taking 15–20 minutes that dramatically improves lighting control. Turn off power at the breaker before working on any electrical switches or fixtures.
Swap outdated hardware for instant updates. Drawer pulls, door handles, and closet hardware take 30 minutes to replace and cost $3–$15 per piece. Brushed brass and matte black finishes dominate 2026 trends, replacing the brushed nickel that’s been standard for years. Keep original hardware if renting or if the pieces have vintage appeal.
Choose decor that serves a purpose beyond filling space. Mirrors reflect light and make rooms feel larger, position them opposite windows when possible. Floating shelves hold books and small plants without the bulk of bookcases. Many successful budget home makeovers rely on DIY art, thrifted finds, and repurposed items rather than mass-market decor.
Incorporate plants if the room gets adequate natural light. Snake plants and pothos tolerate low light and improve air quality. Avoid overwatering, bedrooms typically need less frequent watering than kitchens due to lower humidity. Use pots with drainage holes and saucers to prevent water damage to furniture and floors.
Conclusion
A successful bedroom makeover prioritizes planning, prep work, and intentional choices over trendy purchases. Most of these steps require basic tools and intermediate DIY skills, though structural changes, electrical work, or flooring installation may warrant professional help. Work through the process methodically, allowing proper drying and acclimation times. The result is a refreshed, functional space that supports better sleep and daily routines without the cost or disruption of a full renovation.