Table of Contents
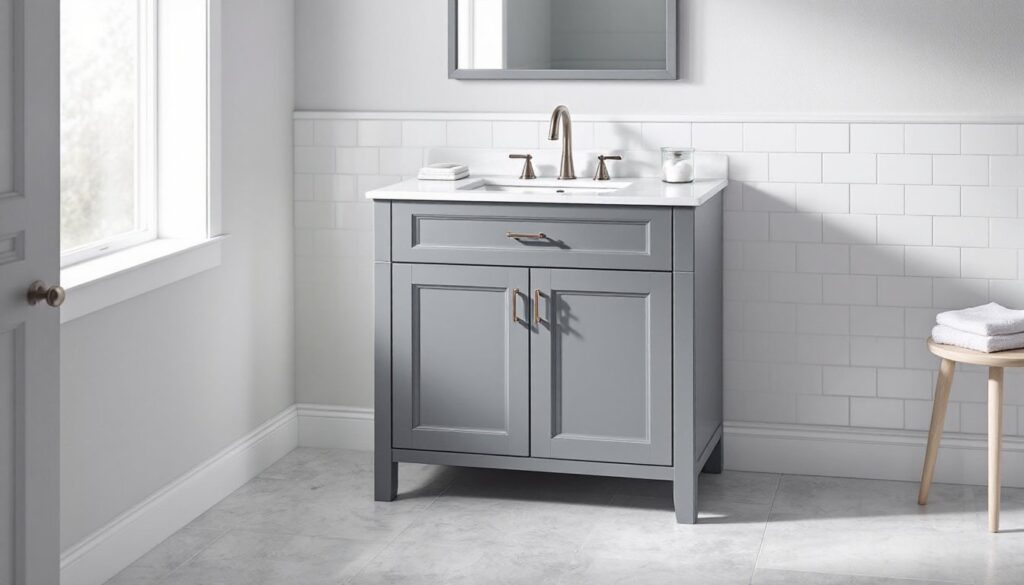
ToggleGray bathroom vanities have become the go-to choice for remodelers who want timeless style without the stark contrast of white or the weight of dark wood. Whether tackling a full bathroom renovation or swapping out a dated vanity, gray offers flexibility that works with nearly any tile, fixture, or wall color. It bridges traditional and modern aesthetics, hides water spots better than white, and doesn’t show dust like black. This guide walks through everything needed to select, pair, and install a gray vanity that’ll look sharp for years, from finish comparisons to countertop matches and real installation considerations.
Key Takeaways
- Gray bathroom vanities offer timeless neutral style that hides water spots and dust better than white or black, making them ideal for both traditional and modern bathrooms.
- Choose between light gray for spaciousness and dark gray for drama, then pair with countertops like white quartz for contrast or gray-veined options that echo the vanity tone.
- Measure standard widths (24–72 inches), verify plumbing alignment, and decide on integrated, undermount, or vessel sink styles before purchasing to avoid costly modifications.
- Secure floating gray vanities with solid wall blocking and lag screws, not drywall anchors alone, and use a level to ensure perfect installation.
- Install your gray bathroom vanity with Teflon tape on supply threads, silicone caulk at seams, and proper shims to prevent unlevel doors and drawers from binding.
- Match hardware finishes (matte black, brushed nickel, or brass) to faucets and fixtures for a cohesive look that complements your gray vanity’s undertones.
Why Gray Bathroom Vanities Are the Perfect Choice
Gray sits in the Goldilocks zone of bathroom design: neutral enough to anchor a space without dictating the palette, yet distinctive enough to add character. A grey bathroom vanity works equally well in a farmhouse powder room with shiplap walls or a sleek contemporary master bath with large-format porcelain tiles.
Practical benefits matter as much as aesthetics. Gray finishes, especially darker tones, conceal minor scratches, watermarks, and the inevitable toothpaste splatters that lighter vanities broadcast. For DIYers managing rental properties or busy family bathrooms, that durability translates to less touch-up work between tenants or over the years.
Gray also offers remarkable flexibility for future updates. Swap out hardware, change the mirror, or repaint walls, and the vanity adapts. White vanities can clash with warmer palettes: dark wood can overpower small spaces. Gray doesn’t have those limitations. Designers and home renovation tutorials consistently recommend gray as a safe yet stylish foundation, and resale data supports it, buyers respond positively to neutral, updated bathrooms that don’t require immediate changes.
Popular Gray Bathroom Vanity Styles and Finishes
Gray isn’t a single color, it’s a spectrum. Grey vanity bathroom designs range from soft dove gray with warm undertones to charcoal with cool blue notes. The finish also plays a critical role: matte paints hide imperfections, satin offers subtle sheen and easier cleaning, and distressed finishes add texture for traditional or rustic settings.
Shaker-style cabinets dominate the market. The clean lines and recessed panel doors suit both classic and transitional bathrooms, and they’re easy to repaint if tastes change. For modern spaces, consider flat-panel (slab) doors in a high-gloss or matte lacquer finish. Floating vanities in medium to dark gray bathroom vanity tones create visual space in small bathrooms and simplify floor cleaning, just verify the wall framing can support the weight (typically requires blocking between studs rated for at least 200 pounds).
Open-shelf vanities and those with a furniture-style base in weathered gray pair well with vessel sinks and brass or matte black fixtures. These designs suit farmhouse and coastal aesthetics but sacrifice storage. Weigh that trade-off honestly: if the bathroom lacks a linen closet, closed cabinetry usually wins.
Light Gray vs. Dark Gray Vanities
Light gray vanities (sometimes called greige when they lean warm) reflect more light and make small bathrooms feel larger. They pair beautifully with white subway tile, marble-look quartz, and brushed nickel or chrome hardware. The risk? They can read as builder-grade if the cabinet quality is low or the gray skews too beige. Look for clean joinery, soft-close hinges, and a finish with slight depth, not flat primer gray.
Dark gray vanities bring drama and anchor larger bathrooms. Charcoal or graphite tones work especially well with white or light-toned walls, creating contrast without the starkness of black. They’re also forgiving: minor dings and daily grime disappear against the deeper color. The downside is they absorb light, so pair them with adequate task lighting, at least 75-100 watts (LED equivalent) flanking the mirror. In bathrooms under 40 square feet, dark vanities can feel heavy unless balanced with light countertops and plenty of natural or artificial light.
Choosing the Right Size and Configuration
Measure twice, order once. Bathroom vanities are sold in standard widths: 24″, 30″, 36″, 48″, 60″, and 72″. Single-sink vanities typically max out at 48″: anything larger usually accommodates double sinks. Before committing to a size, map out door swing clearance (at least 21″ in front of the vanity per IRC guidelines), toilet placement, and shower or tub access.
Depth matters more than most DIYers realize. Standard vanity depth is 21″, but narrow bathrooms benefit from 18″ slim-profile units. Deeper vanities (24″) offer more counter space and storage but can encroach on walking paths. Measure from the back wall (not the baseboard) to ensure the vanity won’t block electrical outlets or interfere with existing plumbing.
For grey bathroom vanity with sink configurations, decide between integrated, undermount, and vessel styles early. Integrated sinks (one-piece top and bowl) simplify installation and eliminate the rim where grime collects, but they limit countertop material choices, usually cultured marble or solid surface. Undermount sinks pair with stone or quartz counters and offer a sleek look but require a waterproof seal and proper support. Vessel sinks sit atop the counter and work with furniture-style vanities but add 5-6″ of height: make sure the faucet and mirror position still function ergonomically.
Double-sink vanities need at least 60″ of width for comfortable use: 72″ is better. Each user should have a dedicated drawer or cabinet section. Check that your plumbing stub-outs align with the sink spacing, moving drain and supply lines in a slab foundation is expensive and often requires cutting concrete.
Best Countertop and Hardware Pairings for Gray Vanities
The countertop makes or breaks a gray vanity bathroom setup. White quartz or marble creates high contrast and a spa-like feel, especially when paired with light gray cabinets. For a softer look, choose quartz with gray veining that echoes the vanity tone, Cambria’s “Torquay” or Caesarstone’s “London Gray” are popular options. Butcher block or live-edge wood counters add warmth but require diligent sealing in a high-moisture environment: apply a food-safe, waterproof finish and re-seal every 6-12 months.
Black or charcoal countertops (honed granite, soapstone, or matte black quartz) pair well with lighter gray vanities and create a bold, modern statement. Avoid pairing a dark gray vanity with a dark countertop unless the bathroom has abundant natural light and white or light walls, you’ll risk a cave effect. Countertop thickness matters too: standard is ¾”, but a 1¼” or 2″ edge (mitered or waterfall) elevates the design if budget allows.
Hardware is the jewelry of cabinetry. Matte black pulls and knobs deliver modern contrast and hide fingerprints. Brushed nickel or chrome keep things light and traditional. Brass or gold (brushed, not shiny) adds warmth and pairs especially well with greige or warm gray vanities. Match the hardware finish to faucets and light fixtures for a cohesive look. Standard pull centers are 3″ or 4″ (measure from center of one screw hole to the other): knobs need a single hole, typically 1¼” diameter. If replacing hardware on an existing vanity, bring an old pull to the hardware store to verify hole spacing before buying.
Installation Tips for Your Gray Bathroom Vanity
Installing a vanity isn’t complicated, but it does require attention to plumbing, level, and wall anchoring. Most vanity swaps are DIY-friendly if you’re replacing a similar-sized unit and the plumbing lines up. If you’re moving plumbing or working with a wall-hung (floating) vanity, budget for a plumber, especially if local code requires permits for supply and drain modifications.
Tools and Materials:
- Adjustable wrench and basin wrench (for tight faucet nuts)
- Level (4′ torpedo or laser level)
- Drill/driver with bits for mounting screws
- Silicone caulk (clear or color-matched)
- Teflon tape for supply line threads
- Shims (composite shims won’t compress like wood)
- Stud finder (for wall-hung vanities or securing backs)
Step-by-Step:
- Shut off water at the angle stops (those small valves under the existing sink). Turn on the faucet to relieve pressure, then disconnect supply lines and the P-trap. Have a bucket and towels ready, there’s always residual water.
- Remove the old vanity. Unscrew from the wall (usually 2-4 screws through the back rail into studs). If caulked, score the seam with a utility knife first to avoid tearing drywall or paint.
- Check the wall and floor. Patch any holes and confirm the floor is level. If it’s off by more than ⅛” over 4 feet, shim the vanity, unlevel vanities cause doors to swing open and drawers to bind.
- Position the new vanity. Slide it into place and check that plumbing lines align. If the vanity has a back panel, you may need to cut access holes for supply and drain lines using a jigsaw or hole saw.
- Level and secure. Use shims under the base if needed, then drive 3″ screws through the mounting rail into wall studs. For bathroom remodel projects with tile or stone backsplashes, predrill to avoid cracking.
- Attach the countertop (if separate). Some vanities come with integrated tops: others require you to secure a separate slab. Run a bead of silicone along the cabinet rim, set the top, and let it cure per the product instructions (usually 24 hours).
- Install the faucet and drain. It’s easier to mount the faucet before setting the vanity, but if you forgot, a basin wrench is your friend. Wrap supply line threads with Teflon tape (3-4 wraps, clockwise), hand-tighten, then snug with a wrench, don’t overtighten or you’ll crack the compression fitting.
- Connect plumbing. Reattach supply lines and the P-trap. Turn water back on slowly and check for leaks. Tighten connections as needed.
- Caulk the seams. Run a thin bead of silicone where the vanity meets the wall and where the countertop (if separate) meets the backsplash. Tool it smooth with a wet finger or caulk tool. Skip caulk under the vanity base if you want the option to slide it out for future floor work.
Floating Vanity Notes: Wall-hung vanities require solid blocking. If studs aren’t positioned where the mounting bracket needs to go, open the drywall and install 2×6 or 2×8 blocking between studs before closing it back up. Use ¼” or ⅜” lag screws into the blocking, drywall anchors alone won’t support the load. Confirm the bracket is level before drilling: even ⅛” off will be visually obvious once the vanity is mounted.
Safety & Codes: If your vanity installation involves moving electrical outlets (common if switching from a medicine cabinet with integrated lighting to sconces), hire a licensed electrician or pull a permit if you’re doing it yourself. Bathrooms require GFCI-protected outlets per NEC, and any outlet within 3 feet of a water source must meet current code. When in doubt, check with your local building department or a contractor familiar with residential codes in your area.
Conclusion
A well-chosen gray bathroom vanity delivers style, durability, and flexibility that few other finishes can match. By balancing tone, size, and countertop pairings, and following solid installation practices, DIYers can achieve a professional result that enhances both function and resale value. Measure carefully, don’t skip the level, and take your time with plumbing connections. The finished product will reward you every morning.